tkinterによる画像二値化GUIアプリケーション
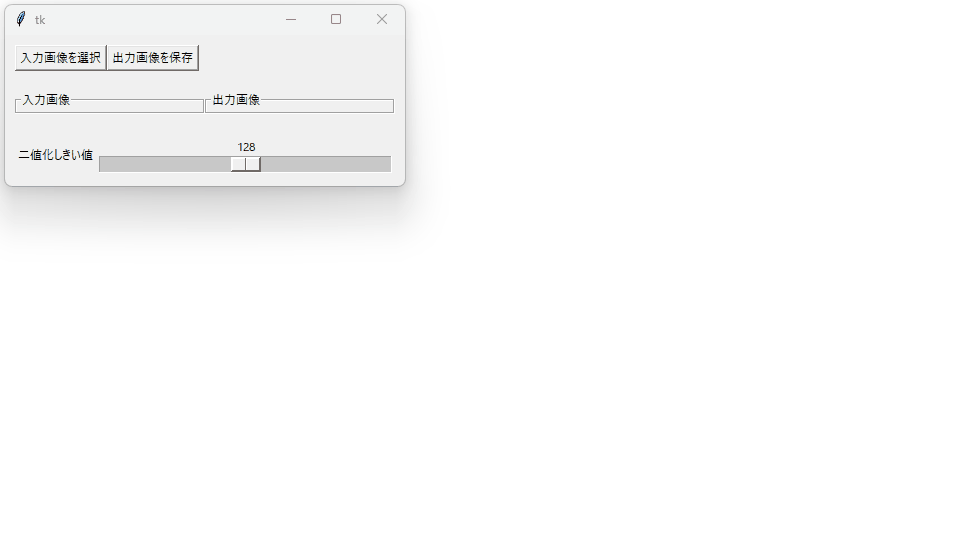
tkinterを使用してグラフィカルに画像二値化を行うアプリケーションのサンプルです。
画像はファイルダイアログから選択して読み込むことができます。 二値化しきい値はスライダーにより操作できます。
コード
"""
tkinterを使用してグラフィカルに画像二値化を行うアプリケーションのサンプルです。
"""

import pyfie
import tkinter as tk
from tkinter import filedialog
from tkinter import messagebox


# 利便のため PyFIE 関数が返すエラーコードに応じて例外を発生させる機能を有効化
pyfie.ctrl.enable_f_err_exception(True)

# ルートウィンドウの作成と設定
root = tk.Tk()
root.grid_columnconfigure(0, weight=1)
root.minsize(400, 100)
root.resizable(True, True)

# グローバル変数
hsrc = None  # 入力画像
hdst = None  # 出力二値画像
src_photo = tk.PhotoImage()
dst_photo = tk.PhotoImage()
thresh_value = tk.IntVar(root, 128)


def update_dst():
    """出力画像の更新"""
    if hsrc is not None:
        pyfie.fnFIE_binarize(hsrc, hdst, thresh_value.get())
        dst_data = pyfie.imencode(hdst, format_ext="png")
        dst_photo.config(data=dst_data)


def on_open_src_image():
    """入力画像ファイルのオープンイベント

    ファイルダイアログで入力画像ファイルを選択させ、
    選択された入力画像ファイルを読み込み、出力画像を更新する"""
    global hsrc
    global hdst
    fname = filedialog.askopenfilename(
        title="入力画像ファイルを選択",
        filetypes=[
            ("画像ファイル", "*.bmp *.png *.jpg *.jpeg *.tif"), ("すべてのファイル", "*.*")]
    )
    if fname:
        try:
            hsrc_candidate = pyfie.imread(fname)
        except Exception as e:
            messagebox.showerror('エラー', '画像の読み込みに失敗しました。\n' + str(e))
            return

        if hsrc_candidate.f_type != pyfie.F_IMG_UC8 or hsrc_candidate.ch != 1:
            messagebox.showerror('エラー', '1チャネルの8ビット濃淡画像のみ受け付けます')
            return
        hsrc = hsrc_candidate
        hdst = hsrc.empty_like(img_type=pyfie.F_IMG_BIN)
        # tk.PhotoImage が対応する画像型は限られるため、PNG形式に再エンコードする
        src_data = pyfie.imencode(hsrc, format_ext="png")
        src_photo.config(data=src_data)
        update_dst()


def on_thresh_changed(value):
    """二値化しきい値の変更イベント"""
    update_dst()


def on_save_dst_image():
    """二値化画像の保存イベント"""
    if hdst is None:
        messagebox.showerror('エラー', '出力画像がありません。')
        return
    fname = filedialog.asksaveasfilename(
        title="名前を付けて保存",
        filetypes=[("画像ファイル", ".png .bmp .tif")],
        defaultextension="png")
    if fname != "":
        try:
            pyfie.imwrite(fname, hdst)
            messagebox.showinfo('保存成功', '二値化画像を保存しました。')
        except Exception as e:
            messagebox.showerror('エラー', '画像の保存に失敗しました。\n' + str(e))
            return


# GUI構成部品の生成と配置
frame_header = tk.Frame(root, padx=10, pady=10)
frame_header.grid(sticky="NSWE")
tk.Button(frame_header, text="入力画像を選択",
          command=on_open_src_image).grid(column=0, row=0)
tk.Button(frame_header, text="出力画像を保存",
          command=on_save_dst_image).grid(column=1, row=0)

frame_body = tk.Frame(root, padx=10, pady=10)
frame_body.grid(sticky="NSWE")
frame_body.grid_columnconfigure(0, weight=1)
frame_body.grid_columnconfigure(1, weight=1)
src_img_frame = tk.LabelFrame(frame_body, text="入力画像")
src_img_frame.grid(column=0, row=0, sticky="NSWE")
dst_img_frame = tk.LabelFrame(frame_body, text="出力画像")
dst_img_frame.grid(column=1, row=0, sticky="NSWE")
tk.Label(src_img_frame, image=src_photo).grid(column=0, row=0)
tk.Label(dst_img_frame, image=dst_photo).grid(column=0, row=0)

frame_footer = tk.Frame(root, padx=10, pady=10)
frame_footer.grid(sticky="NSWE")
tk.Label(frame_footer, text="二値化しきい値").pack(side="left")
frame_footer.grid_columnconfigure(1, weight=1)
tk.Scale(frame_footer, from_=0, to=255, variable=thresh_value, orient=tk.HORIZONTAL,
         command=on_thresh_changed).pack(side="left", fill="x", expand=True)

# メインイベントループ開始
root.mainloop()
スクリーンキャスト(2倍速)